The port and demo project were developed and tested using the 'Large' and 'Small' data models, and the 'Large' and 'Small' code models.
Features of FreeRTOS that are demonstrated by this demo project
The project demonstrates the following FreeRTOS features and techniques:
The 'gatekeeper' task design pattern
The demo LCD task is the only task that is permitted to access the LCD,
so is the LCD 'gatekeeper'. Other tasks and interrupts that want
to write strings to the LCD do not access the LCD directly, but instead
send the string they wish to display to the LCD task using a FreeRTOS
queue.
The 'controller' task design pattern
The LCD task also demonstrates the 'controller' task design pattern.
Messages that are sent to the LCD are structures that contain both a
message type and a message value parameter. The LCD task knows what to
do with the message value (which can be an integer, character pointer,
or anything else) by first inspecting the message type.
Controlled (not free running) polling of an input
A button polling task uses the vTaskDelay() FreeRTOS API function
to control the rate at which it reads a button input. This
removes the need for complex button debouncing, as well as preventing
the task from utilising all of the available processing time.
(Effectively and indirectly) Writing to the LCD from an interrupt service routine
Slow output devices such as LCDs cannot normally be accessed efficiently from an
interrupt service routine. In this demo the joystick select button is
used to generate an external interrupt, and the interrupt service routine
sends a string to the LCD indirectly by sending it to the LCD task on
a message queue. This is using the LCD task as a 'gatekeeper' task as
described above.
An Idle task hook function
The demo makes use of the idle task hook to place the processor into a
low power state. Note however that the demo is implemented using standard
task implementations that are used by many different demos, and is
therefore not optimised for low power operation. Lower power consumption
would be achieved by converting polling tasks into event driven tasks,
and slowing the tick interrupt frequency, etc.
Software timer callback functions
The demo makes use of a software timer to implement 'watchdog'
type functionality. It periodically monitors all the other tasks in the system to
look for any unexpected behaviour. It then sends either a PASS or an
error code status message to the LCD/Controller task. The LCD/Controller
demo task uses the message type member of the message it receives to
interpret the message as a status message, then uses the message value
member of the same message to determine which status string it should
write to the LCD.
The demo application also creates the standard software timer test task,
which is part of the set of standard demo tasks.
A malloc() failed hook function
The malloc() failed hook will be called when a call to pvPortMalloc()
fails because there is not enough FreeRTOS heap memory available
for the allocation to complete.
pvPortMalloc() can be called from application tasks, but is also called
from FreeRTOS API functions that create tasks, queues and semaphores.
Querying the amount of FreeRTOS heap memory that remains unallocated
xPortGetFreeHeapSize() is called from a task after the RTOS scheduler has been
started and outputs the amount of FreeRTOS heap memory that remains
unallocated (the amount of heap memory that is still available) to the
LCD.
IMPORTANT! Notes on using the MSP430X CCStudio 4 Demo
Please read all the following points before using this RTOS port.
The FreeRTOS download contains the source code for all the FreeRTOS ports so
includes many more files than are required for this demo.
See the Source Code Organization
section for a description of the downloaded files and information on creating a
new project.
The CCS project file for the MSP430F5438 demo is located in the
FreeRTOS/Demo/MSP430X_MSP430F5438_CCS4 directory. This is the project
that should be imported into the CCS workspace. The Preparing the Eclipse project
section below contains important information on setting up the demo project directory,
and importing the demo project into Code Composer Studio.
The Demo Application
Demo application hardware setup
The demo application includes an interrupt driven UART test. This creates two
tasks, a transmit task and a receive task. The transmit task transmits characters
on UCA1, and the receive task receives characters on the same UCA1 peripheral. The receive task
expects to receive the characters transmitted by the transmit task, but as there
is no external 9 way connector, the hardware is internally configured to use a
loopback mode. Therefore, unlike other FreeRTOS demos, it is not necessary to
fit an external loopback connector to the UART for the COM port test to work.
Note that the implementation of the UART interrupt service routine is provided to demonstrate the use
of queues from inside an interrupt service routine. It is not intended to
be an example of an efficient interrupt implementation. A real application should make use
of the DMA. Or, as a minimum, transmission and reception could use a simple
RAM ring buffer, and synchronise with a task using a semaphore when a complete
message has been received or transmitted.
The port was developed and tested using a Texas Instruments MSP-FET430UIF USB
debug interface.
Preparing the CCS (Eclipse) project directory
Eclipse projects can be either standard makefile projects, or managed make projects.
The MSP430X CCS4 project uses a managed make project. This in turn means that
either:
All the source files needed to build the project must be located under
the folder/directory that contains the project file itself, or
That the Eclipse workspace (note workspace, not project) needs to be
configured to locate the files elsewhere on the hard disk.
Option 1 is used in this case. To that end, the directory FreeRTOS/Demo/MSP430X_MSP430F5438_CCS4
contains a batch file called CreateProjectDirectoryStructure.bat that
will copy all the required FreeRTOS source files into sub directories inside the
demo project directory.
CreateProjectDirectoryStructure.bat must be executed before the Code Composer Studio
project is imported into the Eclipse workspace.
CreateProjectDirectoryStructure.bat cannot be
executed from within the Code Composer Studio Eclipse IDE.
Importing the demo application project into the CCS Eclipse workspace
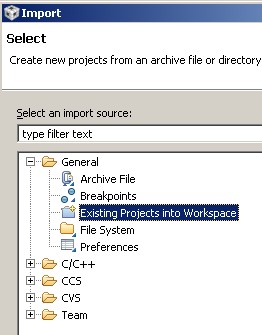
To import the MSP430X CCS project into an existing or new Eclipse Workspace:
Select "Import" from the CCS "File" menu. The dialogue box shown below
will appear.
The dialogue box that appears when "Import" is first clicked
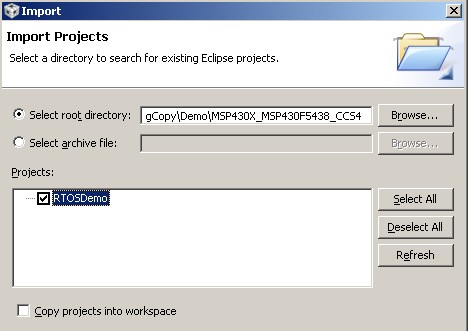
In the next dialogue box, select FreeRTOS/Demo/MSP430X_MSP430F5438_CCS4
as the root directory. Then, make sure the RTOSDemo
project is checked in the "Projects" area, and that the Copy Projects Into
Workspace box is not checked, before clicking
the Finish button (see the image below for the correct check box states,
the finish button is not visible in the image).
Make sure that RTOSDemo is checked, and "Copy projects into workspace" is not checked
Building and running the demo application
Ensure that CreateProjectDirectoryStructure.bat has been executed,
and that the project has been correctly imported into the Eclipse workspace.
Select the required build configuration.
The CCS4 project contains four build configurations. All the build configurations
demonstrate the same functionality, but with different run time models and optimisation
settings as described in the table below.
Build configuration
Description
Debug_Large_Data_Model
Configured to use the large data model, the large code model, and with zero optimisation
Release_Large_Data_Model
Configured to use the large data model, the large code model, and with maximum optimisation.
Debug_Small_Data_Model
Configured to use the small data model, the large code model, and with zero optimisation.
Debug_Small_Data_Small_Code_Model
Configured to use the small data model, the small code model, and with zero optimisation.
Select 'Rebuild All' from the IDE 'Project' menu.
Select 'Debug Active Project' from the IDE 'Target' menu. The MSP430X flash memory will be programmed with the newly built binary. The debugger will then start and run to the beginning of main().
Functionality
The top of this web page lists the FreeRTOS features that are demonstrated
by the MSP430X5438 demo project. The comments contained in the main.c
source file provide more information on how this functionality is implemented
and achieved.
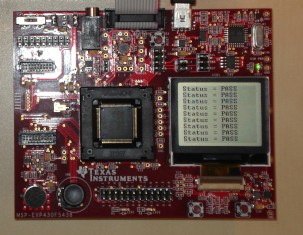
The following behaviour will be observed when the demo is executing correctly:
LED 2 will toggle each time the COM test transmit task transmits a
character.
LED 1 is controlled from the tick interrupt hook function and is used
to indicate that the tick interrupt is running. It will toggle every
0xFF milliseconds.
A status message will be displayed on the LCD every 5 seconds. If the
demo is executing without error then the status will be displayed as
PASS. In all other cases the status message will indicate which task
or test has reported an error.
Pressing or releasing the joystick 'up' button will cause a string
to be displayed on the LCD. The string will indicate the button state.
Pressing the joystick select button (pressing the joystick button
directly downward toward the PCB on which it is mounted) will result
in a message being displayed on the LCD indicating that a button interrupt
has been generated.
FreeRTOS requires exclusive use of a timer that is capable of generating a fast
periodic interrupt called the RTOS 'tick' interrupt. The timer is configured in
a user definable hook (or callback) function, so giving the application writer
the flexibility to decide which timer peripheral is actually used. The name and
prototype of the hook function is shown below:
void vApplicationSetupTimerInterrupt( void );
The constant configTICK_VECTOR must be set to the interrupt vector number of the
chosen peripheral. configTICK_VECTOR is defined in the FreeRTOSConfig.h header
file. This demo project includes an implementation of
vApplicationSetupTimerInterrupt() that configures time TA0 to generate the tick
interrupt and therefore sets configTICK_VECTOR to TIMER0_A0_VECTOR. The provided
code will have to be modified only if the application being developed needs TA0
to be free for some other purpose.
RTOS port specific configuration
Configuration items specific to these demos are contained in FreeRTOS/Demo/MSP430X_MSP430F5438_CCS4/FreeRTOSConfig.h. The
constants defined in this file can be edited to meet the needs of your application. In particular -
configTICK_RATE_HZ
This sets the frequency of the RTOS tick interrupt. The supplied value of 1000Hz is useful for
testing the RTOS kernel functionality but is faster than most applications require. Lowering this value will improve efficiency.
Each port #defines 'BaseType_t' to equal the most efficient data type for that
processor. This port defines BaseType_t to be of type short.
Note that vPortEndScheduler() has not been implemented.
Interrupt service routines
Unlike most ports, interrupt service routines that cause a context switch have
no special requirements and can be written as per the compiler documentation.
The macro portYIELD_FROM_ISR() can be used to request a context switch from within an ISR.
Note that portYIELD_FROM_ISR() must be the last statement in the ISR.
This demo project provides examples of FreeRTOS interrupt service routines -
namely prvSelectButtonInterrupt() defined in main.c and prvUSCI_A0_ISR() defined in
serial.c. Note that prvUSCI_A0_ISR() is implemented to stress the port and
demonstrate queues being used from interrupts - it is not intended to be a demonstration
of an efficient or a generic interrupt service routine!
Switching between the pre-emptive and co-operative RTOS kernels
Set the definition configUSE_PREEMPTION within FreeRTOS/Demo/MSP430X_MSP430F5438_CCS4/FreeRTOSConfig.h to 1 to use pre-emption or 0
to use co-operative.
Compiler options
As with all the ports, it is essential that the correct compiler options are used. The best way to ensure this is to base your
application on the provided demo application files.
Memory allocation
Source/Portable/MemMang/heap_2.c is included in the demo application project to provide the memory
allocation required by the RTOS kernel.
Please refer to the Memory Management section of the API documentation for
full information.
Copyright (C) Amazon Web Services, Inc. or its affiliates. All rights reserved.