SiFive HiFive1 RTOS demo (RISC-V)
[RTOS Ports]
This page documents pre-configured Freedom Studio
(GCC) and IAR Embedded Workbench for RISC-V
projects that build and runs a FreeRTOS RISC-V demo on the
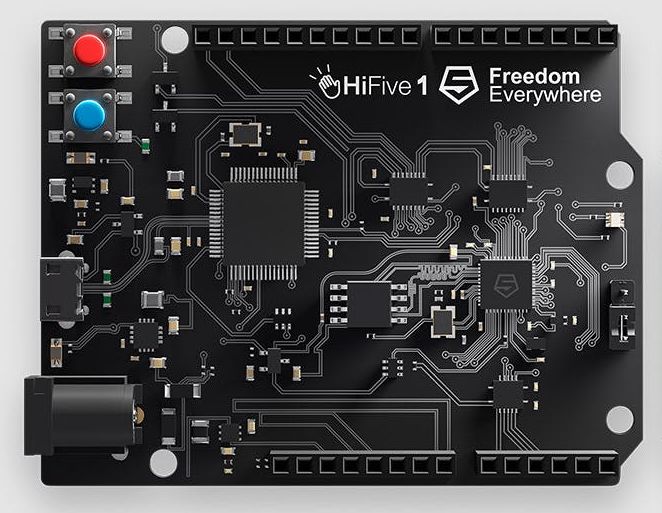
HiFive11 RevB
evaluation board.
IMPORTANT! Notes on using the SiFive RISC-V port
Please read all the following points before using this RTOS port.
- Instructions on using FreeRTOS on RISC-V cores
- Source code organisation
- The demo application functionality
- Building and running the RTOS demo application – Freedom Studio
- Building and running the RTOS demo application – IAR
- RTOS configuration and usage details
Also see the FAQ
My application does not run, what could be wrong?.
Instructions on using FreeRTOS on RISC-V cores
If you want to go beyond just running the demo described on this page, or if you
want to create your own RISC-V FreeRTOS project, then please also read the documentation
page that provides
generic information
on running the FreeRTOS kernel on RISC-V cores.
The FreeRTOS zip file download contains the source code for all the FreeRTOS ports and
demo applications – it therefore contains many more files than are required
to use the FreeRTOS HiFive1 RevB RISC-V demo.
See the
Source Code Organization page for information on the
zip file’s directory structure.
The HiFive1 Freedom Studio and IAR projects are located in the
/Demo/RISC-V_RV32_SiFive_HiFive1-RevB_FreedomStudio
and
Demo/RISC-V_RV32_SiFive_HiFive1-RevB_IAR directories respectively. The
build instructions section provides more information.
On RISC-V architectures the additional
freertos_risc_v_chip_specific_extensions.h header file
is used to extend the base RISC-V RTOS port to any chip specific extensions the target RISC-V
chip may implement. The SiFive core on the HiFive1 provides a Core Local Interrupter (CLINT),
but does not implement any other registers over and above those defined by the base RISC-V
architecture. It therefore uses the freertos_risc_v_chip_specific_extensions.h
header file from the /FreeRTOS/Source/portable/[compiler]/RISC-V/chip_specific_extensions/RV32I_CLINT_no_extensions
directory.
The SiFive HiFive1 RevB RISC-V Demo Application
Functionality
The constant
mainCREATE_SIMPLE_BLINKY_DEMO_ONLY, which is defined at the
top of
main.c, is used to switch between a simple ‘blinky’ style getting started project
and a more comprehensive test and demo application.
When mainCREATE_SIMPLE_BLINKY_DEMO_ONLY is set to 1
When
mainCREATE_SIMPLE_BLINKY_DEMO_ONLY is set to 1
main() calls
main_blinky().
main_blinky() creates a basic example that uses two tasks and one queue, as follows:
-
The Queue Send Task:
The queue send task is implemented by the prvQueueSendTask() function.
It sits in a loop, sending the value 100 to the queue
every second.
-
The Queue Receive Task:
The queue receive task is implemented by the prvQueueReceiveTask()
function. It sits in a loop that blocks on attempts to
read from the queue (no CPU cycles are consumed while the task is blocked),
toggling the blue LED each time the value 100 is
received from the queue send task.
As the queue send task writes to the queue every second
the queue receive task unblocks and toggles the LED
every second.
When mainCREATE_SIMPLE_BLINKY_DEMO_ONLY is set to 0
When
mainCREATE_SIMPLE_BLINKY_DEMO_ONLY is set to 0
main() calls
main_full().
main_full() creates a subset of the standard demo
tasks. Standard demo tasks are used by all FreeRTOS port demo applications.
They have no specific functionality, and are created just to demonstrate how to use the FreeRTOS API,
and test the RTOS port.
A ‘check’ task is created that periodically inspects the standard
demo tasks (which contain self monitoring code) to ensure all the tasks are functioning
as expected. The check task toggles the blue LED each time it executes.
This gives visual feedback of the
system health. If the LED toggles every 3 seconds, then the
check task has not discovered any problems. If the LED toggles every 500ms, then the check task has
discovered a problem in one or more tasks.
Important note:
The project will not build if the directory structure is different to
the directory structure used in official FreeRTOS zip file releases.
Ensure the ‘copy projects into workspace’ check box is
not checked when importing the project into
the Freedom Studio Eclipse workspace.
To open and build the Freedom Studio RISC-V project:
-
Download and install the Freedom Studio development tools (scroll down to see software downloads).
-
Start Freedom Studio and either select an existing or create a new workspace
when prompted.
-
Select “Import…” from the Freedom Studio ‘File’ menu. The Import dialog box
will open.
-
In the Import dialog box, select “General->Existing Project into Workspace”.
The Import Projects dialog box will open.
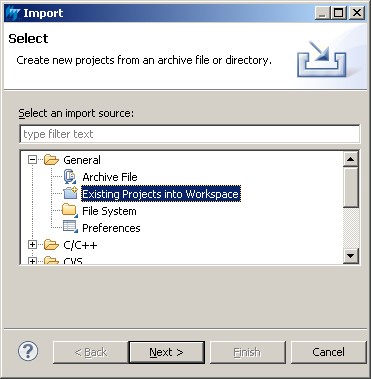 Importing an existing project into the workspace
-
In the Import Projects dialog box, navigate to and select the
FreeRTOS/Demo/RISC-V_RV32_SiFive_HiFive1-RevB_FreedomStudio
directory, and ensure the ‘copy projects into workspace’
check box is not checked.
 Selecting the directory and project in the Import Project
dialog box. Click to enlarge.
Selecting the directory and project in the Import Project
dialog box. Click to enlarge.
-
In the ‘Projects’ window of the Import Projects dialog box, select the RTOSDemo project, and click finish.
The project will be imported into your Eclipse workspace - the steps from here are just to check the path to the
compiler is correct.
-
Select "Properties" from the IDE's "Project" menu.
-
In the "Properties" window, expand the "C/C++ Build" menu item then select its "Settings" item.
-
In the "Tool Settings" sub-window, select "Cross Settings".
-
In the window, ensure the Path to the compiler is correct for your installation. The
image below shows the default path that will use the compiler installed
when Freedom Studio was installed - although the GCC version number may
change.

Configuring the path to the desired toolchain (click to enlarge).
- When the path the the compiler is correct, in the "Properties" window, select "Apply and Close".
-
Select “Build all” from the Freedom Studio ‘Project’ menu. The FreeRTOS source and
demo source files should build
without any errors or warnings (although third party driver code may generate warnings),
and create a file called RTOSDemo.elf.
To program the HiFive1 RevB board and debug the RTOS demo using Freedom Studio:
-
Connect the HiFive1 RevB board to your host computer using a USB cable.
-
Click the small arrow next to the debug speed button, and select
“Debug Configurations…” from the pop up menu to bring up the
debug configurations window.
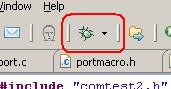 The debug speed button
-
In the debug configurations window, double click “SiFive GDB SEGGER J-Link Debugging”
to create a debug configuration.
The J-Link is built onto the HiFive1 RevB board – you do not need a separate
J-Link interface.
 Creating a J-Link debug configuration
-
In the debug configuration, click the Debug button to program the HiFive1 RevB
RISC-V evaluation board and start a debug session – after which the normal
Eclipse debug menu items can be used to run and debug the RTOS application.
It may be necessary to set the device name in the debug configuration
before being able to start a debug session.
 Setting the device name in the debug configuration
To open and build the IAR Embedded Workbench for RISC-V project:
-
Open /FreeRTOS/Demo/RISC-V_RV32_SiFive_HiFive1-RevB_IAR/RTOSDemo.eww
from within the IAR Embedded Workbench for RISC-V IDE.
-
Select “Rebuild All” from the IDE’s “Project” menu (or just press F7) – the
RTOS demo should build without any errors or warnings other than
informative #warning messages.
To program the HiFive1 RevB board and debug the RTOS demo using IAR Embedded Workbench:
-
Connect an IAR I-Jet debug interface between the host computer and the 10-pin debug
connector marked J1 on the HiFive1 Reb B development board.
 IAR I-Jet connected to the HiFive1 evaluation board
-
Select “Download and Debug” from the IDE’s “Project” menu (or press CTRL+D)
to program the HiFive1 RevB RISC-V evaluation board and start a debug session
– after which the normal IAR debug menu items can be used to run and debug
the RTOS application.
RTOS port specific configuration
This section relates to the information provided on the
Running FreeRTOS on RISC-V Cores
documentation page:
-
Configuration items specific to the Freedom Studio project are contained in FreeRTOS/Demo/RISC-V_RV32_SiFive_HiFive1-RevB_FreedomStudio/FreeRTOSConfig.h.
Configuration items specific to the IAR project are contained in FreeRTOS/Demo/RISC-V_RV32_SiFive_HiFive1-RevB_IAR/FreeRTOSConfig.h.
The constants defined in these files
can be edited to suit your application. In particular, as the SiFive RISC-V core includes a
machine timer (MTIMER) configMTIME_BASE_ADDRESS and configMTIMECMP_BASE_ADDRESS
are defined to 0x20000BFF8 and 0x20004000 respectively.
-
The SiFive core includes a core local interrupter (CLINT), but does not
include any further registers over and above those defined
by the base RISC-V architecture. The project therefore uses the
freertos_risc_v_chip_specific_extensions.h
header file located in the /FreeRTOS/Source/portable/[compiler]/RISC-V/chip_specific_extensions/RV32I_CLINT_no_extensions directory,
so that directory is in the assembler’s include path.
-
The interrupt handler provided in the SiFive software development kit (SDK) and used
by the Freedom Studio project
is called trap_handler, so the assembler’s command line options include
-DportasmHANDLE_INTERRUPT=handle_trap.
At the time of writing, the IAR project uses a skeleton trap handler called vApplicationHandleTrap(), which is defined in main.c.
-
The file flash.lds is a version of the linker
script provided with the Freedom Studio development tools, edited to add the __freertos_irq_stack_top
linker variable necessary to ensure the stack that was used by main before
the scheduler starts is reused as the interrupt stack after the scheduler starts.
The IAR project uses the configISR_STACK_SIZE_WORDS constant to dimension a
statically allocated interrupt stack.
Other notes:
-
vPortEndScheduler() has not been implemented.
-
Source/Portable/MemMang/heap_4.c is included in the RISC-V projects to provide the memory
allocation required by the RTOS kernel.
Please refer to the Memory Management section of the API documentation for
full information.
-
At the time of writing, the demo does not support interrupt nesting.
Copyright (C) Amazon Web Services, Inc. or its affiliates. All rights reserved.