AWS IoT Fleet Provisioning Demo
Introduction
The AWS IoT Fleet Provisioning Demo showcases a way to provision a fleet of IoT devices with unique
certificates and register them with AWS IoT Core using the Fleet Provisioning feature. This demo
shows how devices with the ability to generate a public-private key-pair on board can utilize a
common claim certificate (across the entire fleet of devices) to request unique certificates from
AWS IoT Core for their generated key-pairs, and register themselves with AWS IoT Core as
AWS IoT thing resources.
For more information on the Fleet Provisioning feature of AWS IoT, refer to
Provisioning devices that don't have device certificates using fleet
provisioning in the AWS IoT Developer's Guide. There are two provisioning workflows with Fleet
Provisioning, Provisioning by Claim and
Provisioning by Trusted User. This demo shows how
to use the Provisioning by Claim workflow to provision devices with unique certificates
using a common Claim certificate registered with AWS IoT Core. This demo project uses the
free community edition of Visual Studio.
Prior to starting the Fleet Provisioning demo, we recommend that you use the
corePKCS11 Mutual Authentication Demo (MQTT) to connect
to AWS IoT. That will ensure that connectivity to AWS IoT is working correctly and that corePKCS11
credential management is functioning properly.
Source Code Organization
The demo project is called fleet_provisioning_demo.sln and can be found in the
FreeRTOS repository on GitHub
in the following directory:
FreeRTOS-Plus/Demo/AWS/Fleet_Provisioning_Windows_Simulator/Fleet_Provisioning_With_CSR_Demo
Setting up AWS resources before running the demo
To use the Fleet Provisioning feature of AWS IoT Core, you must set up an IAM role and a
Provisioning Template in your AWS account. These AWS resources can be set up either through
the AWS console or programmatically through the AWS CLI. The following instructions guide you through
the set up of these resources using the AWS CLI. (In the following example commands, replace the
<aws-region> and <aws-account-id> with the AWS Region and ID
relevant to your AWS account.) For information on setting up the AWS CLI, see
Getting started with the AWS CLI.
Navigate to the demo subfolder at
FreeRTOS-Plus/Demo/AWS/Fleet_Provisioning_Windows_Simulator/Fleet_Provisioning_With_CSR_Demo.
Create an IAM role that will be needed by a fleet provisioning template.
aws iam create-role \
    --role-name "FleetProvisioningDemoRole" \
    --assume-role-policy-document '{"Version":"2012-10-17","Statement":[{"Action":"sts:AssumeRole","Effect":"Allow","Principal":{"Service":"iot.amazonaws.com"}}]}'
Attach the "AWSIoTThingsRegistration" policy to the role created in the above step. This allows
the role to register new AWS IoT Things.
aws iam attach-role-policy \
    --role-name "FleetProvisioningDemoRole" \
    --policy-arn arn:aws:iam::aws:policy/service-role/AWSIoTThingsRegistration
- Create an AWS IoT Policy which the Fleet Provisioning Claim will attach to newly-created things.
An example IoT thing policy which you can modify to work with the demo can be found in the
"example_iot_thing_policy.json" file. Before you
run the following command, modify the "
example_iot_thing_policy.json" file by
replacing all occurrences of the following items in angle brackets:
- <aws-region> with the AWS region of your choice (e.g. us-west-2)
- <aws-account-id> with your AWS account ID
aws iot create-policy \
    --policy-name FleetProvisioningDemoThingPolicy \
    --policy-document file://example_iot_thing_policy.json
- Create an IoT Thing Type. This Thing Type will be attached to all things created by the Fleet
Provisioning demo, which allows for easy cleanup.
aws iot create-thing-type --thing-type-name "fp_demo_things"
- Create the template resource which will be used for provisioning the demo application. This
needs to be done only once. For more information on fleet provisioning templates, refer to
this guide. An example fleet provisioning
template which works with the demo can be found in the
"
example_fleet_provisioning_template.json" file.
aws iot create-provisioning-template \
--template-name FleetProvisioningDemoTemplate \
--provisioning-role-arn arn:aws:iam::<aws-account>:role/FleetProvisioningDemoRole \
--template-body file://example_fleet_provisioning_template.json \
--enabled
- After you've made your fleet provisioning template, you can verify it was successfully created
using the following CLI command.
aws iot describe-provisioning-template --template-name FleetProvisioningDemoTemplate
- Create an ECDSA Keypair and Certificate to be used as a Root Certificate in the AWS IoT Console.
NOTE: corePKCS11's MbedTLS Port only supports ECDSA Keys using the prime256v1 curve at this time.
For more information please refer to corePKCS11's core_pkcs11_mbedtls.c
openssl req -new -newkey ec -pkeyopt ec_paramgen_curve:prime256v1 \
    -x509 -nodes -days 30 -out Root_ECDSA_Cert.pem -keyout Root_ECDSA_Key.pem
- Register the new CA Cert either through the AWS IoT Console, or by using the AWS CLI
aws iot register-ca-certificate \
    --ca-certificate file://Root_ECDSA_Cert.pem \
    --certificate-mode SNI_ONLY
- Generate an ECDSA Certificate, that is signed by the previously generated Cert, to be used as the Claim Cert for the demo
openssl req -new -newkey ec -pkeyopt ec_paramgen_curve:prime256v1 \
    -CA Root_ECDSA_Cert.pem -CAkey Root_ECDSA_Key.pem \
    -x509 -nodes -days 14 -out ECDSA_Claim_Cert.pem -keyout ECDSA_Claim_Key.pem
- Register the Claim Certificate with the AWS IoT Core either through the AWS IoT Console, or the AWS CLI:
NOTE: You will need the ARN that is returned by this function in a later step!
aws iot register-certificate \
    --set-as-active \
    --certificate-pem file://ECDSA_Claim_Cert.pem \
    --ca-certificate-pem file://Root_ECDSA_Cert.pem
- Create an IoT policy for the Claim certificate. The following is the AWS CLI command for
creating an IoT Policy. An example Claim certificate policy can be found in the
"
example_claim_policy.json" file. Before you
run the create-policy command, modify "example_claim_policy.json" by
replacing all occurrences of the following items in angle brackets:
- <aws-region> with the AWS region of your choice (e.g. us-west-2)
- <aws-account-id> with your AWS account ID
aws iot create-policy \
    --policy-name FleetProvisioningDemoClaimPolicy \
    --policy-document file://example_claim_policy.json
- Attach the policy to the claim certificate. Replace
<Claim-Cert-ID> with
the certificate ID of the Claim Certificate that you created in Step 11.
aws iot attach-policy \
--target "arn:aws:iot:<aws-region>:<aws-account-id>:cert/<Claim-Cert-ID>" \
--policy-name "FleetProvisioningDemoClaimPolicy"
Configure the Demo Project
The demo uses the FreeRTOS-Plus-TCP TCP/IP stack, so follow the
instructions provided for the
TCP/IP starter project to:
- Install the pre-requisite components (such as WinPCap).
- Optionally set a static or dynamic IP address, gateway address and netmask.
- Optionally set a MAC address.
- Select an Ethernet network interface on your host machine.
The above settings should be changed in the file
FreeRTOSConfig.h in the Fleet
Provisioning demo project.
Configure demo_config.h. The following macros must be defined by the user for the demo to work:
democonfigMQTT_BROKER_ENDPOINTdemoconfigROOT_CA_PEMdemoconfigPROVISIONING_TEMPLATE_NAME
Convert the Claim certificate and private key files you created in Step 8 above to DER format.
This can be done manually or by using the included Python script "convert_credentials_to_der.py".
- Option 1 - Using the included Python script:
- The script requires Python 3. If you do not have the 'cryptography' Python module
installed, run the command
pip3 install cryptography
Navigate to the folder
...\FreeRTOS-Plus\Demo\AWS\Fleet_Provisioning_Windows_Simulator\Fleet_Provisioning_With_CSR_Demo\DemoSetup
and move the .pem files to this folder.
Run the script:
python3 convert_credentials_to_der.py -c ClaimCertificate.pem -k ClaimPrivateKey.pem
which will output the equivalent .dat files in the same location where the script is run.Move the *.dat files into
...\FreeRTOS-Plus\Demo\AWS\Fleet_Provisioning_Windows_Simulator\Fleet_Provisioning_With_CSR_Demo
- Option 2 - Manually convert the PEM files:
- Use your preferred method of converting PEM files to a PKCS #11 compatible DER format.
Here is an example using OpenSSL:
-
openssl x509 -outform der -in "ClaimCertificate.pem" -out corePKCS11_Claim_Certificate.dat
-
openssl rsa -in ClaimPrivateKey.pem -out corePKCS11_Claim_Key.dat -outform DER
- Move the
*.dat files into ...\FreeRTOS-Plus\DemoAWS\Fleet_Provisioning_Windows_Simulator\Fleet_Provisioning_With_CSR_Demo
Build the Demo Project
The demo project uses the free community edition of Visual Studio. To build the demo:
- Open the Visual Studio solution file
FreeRTOS-Plus/Demo/AWS/Fleet_Provisioning_Windows_Simulator/Fleet_Provisioning_With_CSR_Demo/fleet_provisioning_demo.sln
from within the Visual Studio IDE.
- Select build solution from the IDE's build menu.
Functionality
The demo showcases the Provisioning by Claim workflow of the Fleet Provisioning feature of
AWS IoT Core using corePKCS11 for credential management.
- The demo connects to the AWS IoT MQTT broker using the Claim credentials prepared in step 13.
- The demo creates and stores new key-pair and certificate files using corePKCS11. These credentials
will be later used to provision a new AWS IoT thing.
- The CreateCertificateWithCsr MQTT API is called
to make a Certificate Signing Request (CSR), so that AWS IoT will acknowledge and sign the certificate.
- The RegisterThing MQTT API is called to create a
new AWS IoT thing which uses the key-pair and newly-signed certificate.
- After the new thing is provisioned, the demo disconnects from the AWS IoT MQTT broker.
- The demo connects to the AWS IoT MQTT broker using the newly-created thing credentials to verify
that the thing was successfully registered.
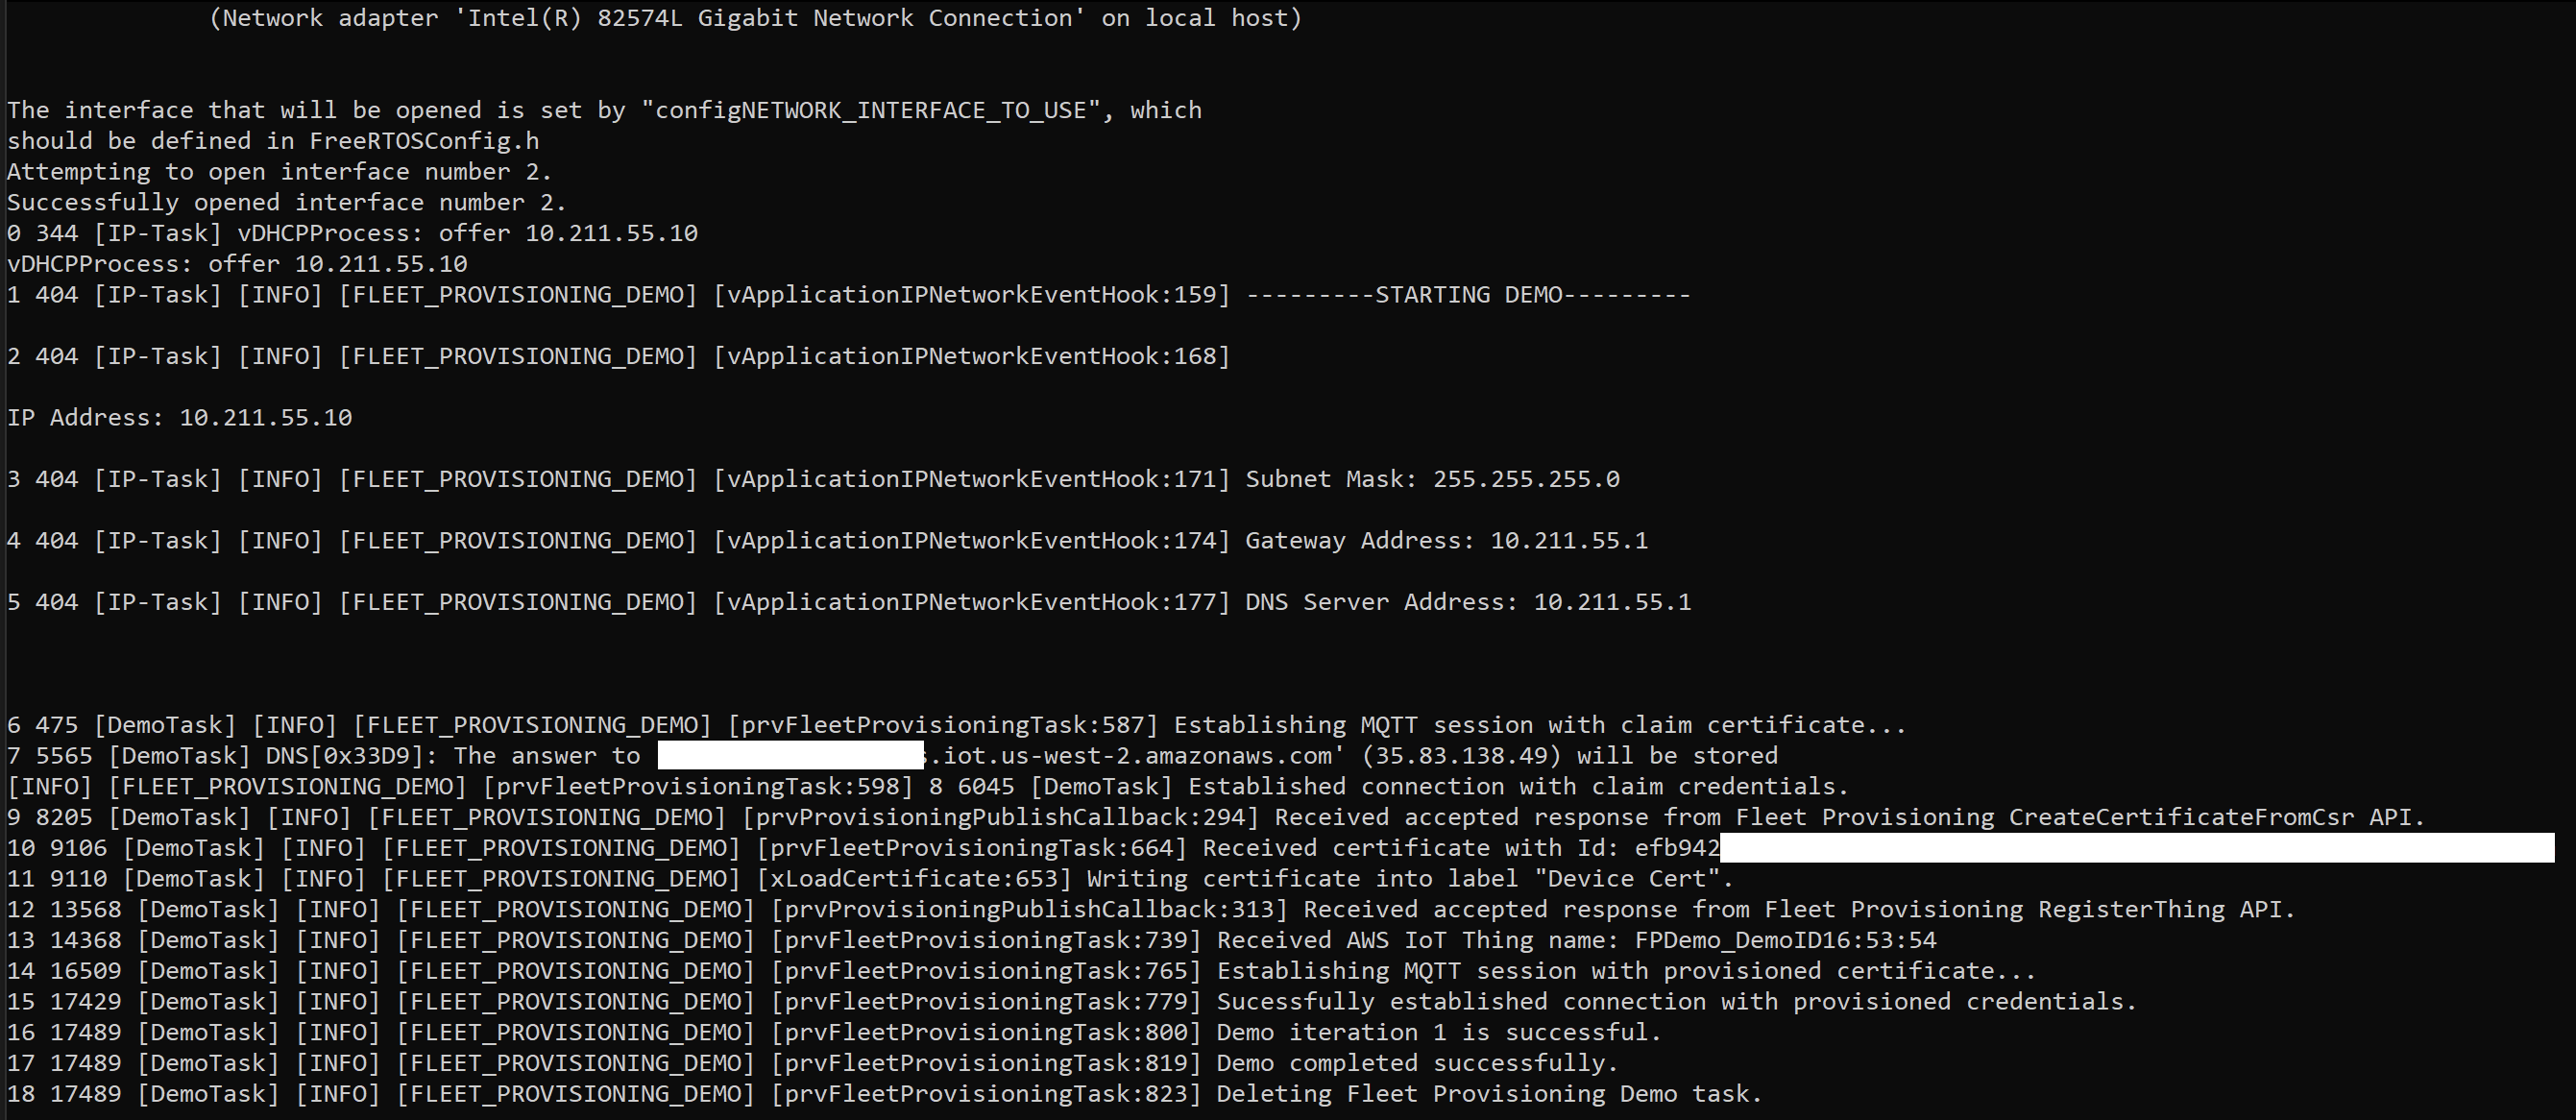
The source code for the prvFleetProvisioningTask() function can be found in the
FleetProvisioningDemoExample.c file on GitHub.
The screenshot below shows the expected output when the demo executes correctly:
 Click to Enlarge
Copyright (C) Amazon Web Services, Inc. or its affiliates. All rights reserved.