FreeRTOS and Reliance Edge Demo
Using the Fail Safe File System with the FreeRTOS Windows Port


Download the Reliance Edge Developer's Guide
Evaluate now!
License Information
Watch the video
"Our products are used from the bottom of the ocean, to the depths
of space, and from the factory floor, to your hip pocket"
- Ken Whitaker, Tuxera
"Tuxera's family of Reliance fail safe file systems have
delivered proven reliability in hundreds of millions of devices."
- Kerri McConnell, Tuxera
"The design goals and implementation of Reliance Edge
means it is no ordinary file system. Reliance Edge will
be a valuable resource for our users, so we are happy to
accept it as an official FreeRTOS-Plus component."
- Richard Barry, Amazon Web Services Inc.
This page presents a project that runs FreeRTOS and Datalight's Reliance
edge fail safe file system in a Windows environment.
The FreeRTOS Windows port provides a convenient and non embedded target
specific evaluation platform. It allows FreeRTOS, and some FreeRTOS-Plus
components, to be executed on a standard Windows computer, using
feature rich and free development tools. However, unlike when FreeRTOS
is executed on real embedded hardware, the Windows port does not exhibit
true real time behaviour.
On this page:
The project described on this page is located in the following folder of
the main
FreeRTOS .zip file download:
FreeRTOS-Plus/Demo/FreeRTOS_Plus_Reliance_Edge_and_CLI_Windows_Simulator
The project creates a RAM disk using the
FreeRTOS Windows port.
The Windows port provides a convenient evaluation platform, but it
does not exhibit real time behaviour. Simulated time might be slower than
real time.
The project is pre-configured to build with the
free Express edition of Microsoft Visual C++
(MSVC). MSVC Express Edition 2010 was used.
The demo:
-
Creates and formats a RAM disk.
-
Creates then reads back a set of example files in the root directory of the RAM disk.
-
Creates sub-directories.
-
Creates then reads back a set of example files from the created sub-directories.
-
Creates a command console (using
FreeRTOS-Plus-CLI)
that implements the commands described below:
|
Command and parameters
|
Description
|
|
dir <filename>
|
Lists the files in the named directory
|
|
type <filename>
|
Prints file contents to the terminal
|
|
append <filename>
|
Appends data to a file (creating the file if it does not exist)
|
|
del <filename>
|
Deletes a file or directory
|
|
copy <source file> <dest file>
|
Copies <source file> to <dest file>
|
|
create <filename>
|
Creates an empty file
|
|
mkdir <filename>
|
Creates an empty directory
|
|
rename <source file> <dest file>
|
Rename <source file> to <dest file>
|
|
link <source file> <dest file>
|
Create hard link <dest file> pointing at <source file>
|
|
stat <filename>
|
Show file information
|
|
statfs
|
Show file system information
|
|
format
|
Re-formats the file system volume. ALL FILES WILL BE DELETED!
|
|
transact
|
Commits a Reliance Edge transaction point
|
|
transmaskget
|
Retrieves the Reliance Edge automatic transaction mask
|
|
transmaskset <hex mask>
|
Sets the Reliance Edge automatic transaction mask
|
|
abort
|
Rolls back all changes not part of the last transaction point
|
|
test-fs
|
Executes file system tests. ALL FILES WILL BE DELETED!
|
The command console is accessed from a UDP terminal.
See the
Usage Instructions section below.
-
The demo application is available in the main
FreeRTOS .zip file download.
-
Open the Visual Studio solution file FreeRTOS_Plus_Reliance_Edge_with_CLI.sln
from within the Visual Studio IDE. The solution file is located
in the "FreeRTOS-Plus/Demo/FreeRTOS_Plus_Reliance_Edge_and_CLI_Windows_Simulator"
directory.
-
Select "Build Solution" from the IDE's Build menu (or press F7)
to build the application.
In Visual Studio, press F10 to start a debug session and break on entry to
main().
The same host computer is used to build the application, debug the application,
and (because the FreeRTOS Win32 port is used) run the application.
There are no special debugging instructions.
-
The demo application creates a set of files and directories on
a RAM disk, outputting information to the Windows console as it
goes.
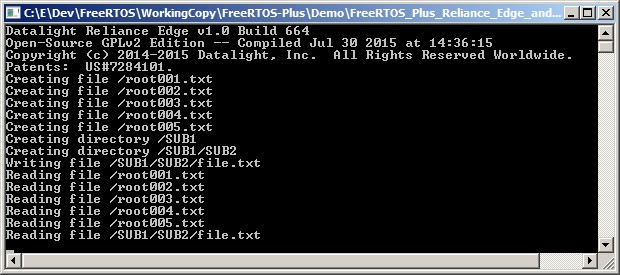 The output generated in the Windows console when the fail safe embedded file system demo application starts
-
A local UDP connection is used to connect to the FreeRTOS-Plus-CLI
command line interface. The Windows TCP/IP stack is used
instead of FreeRTOS-Plus-TCP to ensure
the demo remains focused on the file system. A demo application
that uses the FreeRTOS Windows port and FreeRTOS-Plus-TCP to create
a command console is available in the FreeRTOS-Plus-TCP
section of this website.
Free dumb terminal programs that are suitable for connecting to
the command line interface using UDP include
YAT and
Hercules.
The standard localhost IP address (127.0.0.1) can be used because
both the (simulated) demo application and the UDP terminal execute
on the same computer. FreeRTOS-Plus-CLI listens for characters
arriving on UDP port 5001 and sends its output to UDP port 5002.
The required terminal configuration is shown below.
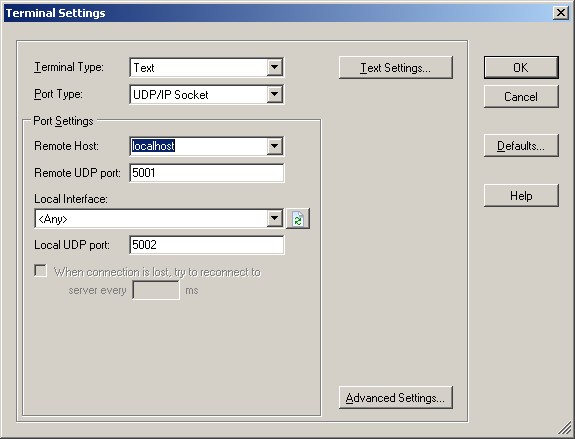 Configuring the YAT terminal to communication with the
FreeRTOS-Plus-CLI command line interface
Configuring the YAT terminal to communication with the
FreeRTOS-Plus-CLI command line interface
-
Type "help" to see a list of registered commands.
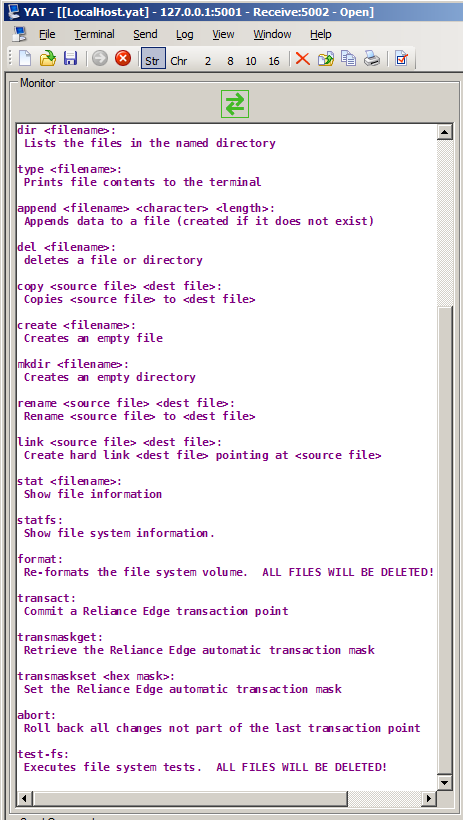 Type "help" in the UDP terminal to see a list of registered commands
-
Experiment with the file system commands! A sample session is shown below.
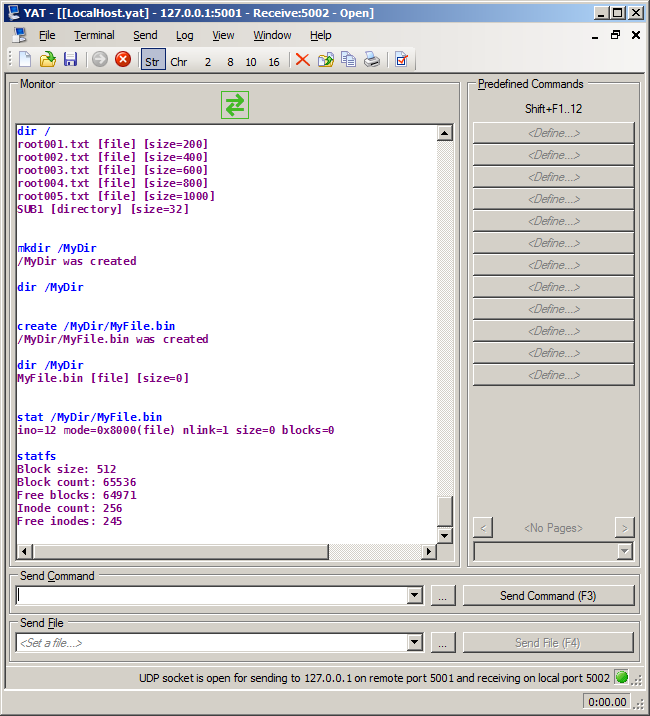 Running safety critical file system commands in the YAT terminal
Copyright (C) Amazon Web Services, Inc. or its affiliates. All rights reserved.